AP Profile
Overview
At the heart of all wireless AP configurations on the Zyxel Device are profiles. A profile represents a group of saved settings that you can use across any number of connected APs. You can set up the following wireless profile types:
• Radio - This profile type defines the properties of an AP’s radio transmitter. You can have a maximum of 64 radio profiles on the Zyxel Device.
• SSID - This profile type defines the properties of a single wireless network signal broadcast by an AP. Each radio on a single AP can broadcast up to 8 SSIDs. You can have a maximum of 64 SSID profiles on the Zyxel Device.
• Security - This profile type defines the security settings used by a single SSID. It controls the encryption method required for a wireless client to associate itself with the SSID. You can have a maximum of 64 security profiles on the Zyxel Device.
• MAC Filtering - This profile provides an additional layer of security for an SSID, allowing you to block access or allow access to that SSID based on wireless client MAC addresses. If a client’s MAC address is on the list, then it is either allowed or denied, depending on how you set up the MAC Filter profile. You can have a maximum of 64 MAC filtering profiles on the Zyxel Device.
• Layer-2 Isolation - This profile defines the MAC addresses of the devices that you want to allow the associated WiFi clients to have access to when layer-2 isolation is enabled.
SSID
The SSID (Service Set IDentifier) is the name that identifies the Service Set with which a wireless station is associated. Wireless stations associating to the access point (AP) must have the same SSID. In other words, it is the name of the WiFi network that clients use to connect to it.
WEP
WEP (Wired Equivalent Privacy) encryption scrambles all data packets transmitted between the AP and the wireless stations associated with it in order to keep network communications private. Both the wireless stations and the access points must use the same WEP key for data encryption and decryption.
WPA2
WPA2 (IEEE 802.11i) is a WiFi security standard that defines stronger encryption, authentication and key management than WPA. Key differences between WPA2 and WEP are improved data encryption and user authentication.
WPA3
WPA3 is a WiFi security standard based on IEEE 802.11i, with security improvements like adopting enhanced PSK (Pre-Shared Key) authentication mechanism.
Personal vs Enterprise
A secure WiFi connection relies on WiFi encryption and authentication. There are two authentication modes: Personal and Enterprise.
Personal mode requires a password called Pre-Shared Key (PSK). Users enter the same PSK to connect to the WiFi network.
Enterprise mode requires an external RADIUS server for authentication. Authentication of user identity is required to connect to the WiFi network.
IEEE 802.1X
The IEEE 802.1X standard outlines enhanced security methods for both the authentication of wireless stations and encryption key management. Authentication is done using an external RADIUS server.
IEEE 802.11k/v Assisted Roaming
IEEE 802.11k is a standard for radio resource management of wireless LANs, which allows clients to request neighbor lists from the connected AP and discover the best available AP when roaming. An 802.11k neighbor list can contain up to six BSSIDs with the highest RCPI (Received Channel Power Indicator) value in both bands (5 GHz and 2.4 GHz, in the ratio of 4:2).
The IEEE 802.11v BSS Transition Management feature lets an AP automatically provide load information of the neighbor APs to clients. It helps the Zyxel Device steer clients to a suitable AP for better performance or load balancing.
Radio
This screen allows you to create radio profiles for the Zyxel Device. A radio profile is a list of settings that an Zyxel Device can use to configure its radio transmitter(s).
Note: You can have a maximum of 32 radio profiles on the Zyxel Device.
Label | Description |
|---|---|
Add | Click this to add a new radio profile. |
Edit | Click this to edit the selected radio profile. |
Remove | Click this to remove the selected radio profile. |
Activate | To turn on an entry, select it and click Activate. |
Inactivate | To turn off an entry, select it and click Inactivate. |
Object Reference | Click this to view which other objects are linked to the selected radio profile. |
# | This field is a sequential value, and it is not associated with a specific user. |
Status | This field shows whether or not the entry is activated. A yellow bulb signifies that this rule is active. A gray bulb signifies that this rule is not active. |
Profile Name | This field indicates the name assigned to the radio profile. |
Frequency Band | This field indicates the frequency band which this radio profile is configured to use. |
Apply | Click Apply to save your changes back to the Zyxel Device. |
Reset | Click Reset to return the screen to its last-saved settings. |
Add/Edit Radio Profile
This screen allows you to create a new radio profile or edit an existing one.
Label | Description |
|---|---|
Hide / Show Advanced Settings | Click this to hide or show the Advanced Settings in this window. |
General Settings | |
Activate | Select this option to make this profile active. |
Profile Name | Enter up to 31 alphanumeric characters to be used as this profile’s name. Spaces and underscores are allowed. |
802.11 Band | Select whether this radio would use the 2.4 GHz or 5 GHz band. |
802.11 Mode | Select how to let wireless clients connect to the AP. If 802.11 Band is set to 2.4G: • 11b/g: allows either IEEE 802.11b or IEEE 802.11g compliant WLAN devices to associate with the Zyxel Device. The Zyxel Device adjusts the transmission rate automatically according to the wireless standard supported by the wireless devices. • 11n: allows IEEE802.11b, IEEE802.11g and IEEE802.11n compliant WLAN devices to associate with the Zyxel Device. • 11ax: allows IEEE802.11b, IEEE802.11g, IEEE802.11n, and IEEE802.11ax compliant WLAN devices to associate with the Zyxel Device. If the WLAN device isn’t compatible with 802.11ax, the Zyxel Device will communicate with the WLAN device using 802.11n, and so on. If 802.11 Band is set to 5G: • 11a: allows only IEEE 802.11a compliant WLAN devices to associate with the Zyxel Device. • 11n: allows both IEEE802.11n and IEEE802.11a compliant WLAN devices to associate with the Zyxel Device. • 11ac: allows IEEE802.11n, IEEE802.11a, and IEEE802.11ac compliant WLAN devices to associate with the Zyxel Device. If the WLAN device isn’t compatible with 802.11ac, the Zyxel Device will communicate with the WLAN device using 802.11n, and so on. • 11ax: allows IEEE802.11n, IEEE802.11a, IEEE802.11ac, and IEEE802.11ax compliant WLAN devices to associate with the Zyxel Device. If the WLAN device isn’t compatible with 802.11ax, the Zyxel Device will communicate with the WLAN device using 802.11ac, and so on. |
Channel Width | Select the channel bandwidth you want to use for your wireless network. Select 20 MHz if you want to lessen radio interference with other wireless devices in your neighborhood. Select 20/40 MHz to allow the Zyxel Device to choose the channel bandwidth (20 or 40 MHz) that has least interference. Select 20/40/80 to allow the Zyxel Device to choose the channel bandwidth (20 or 40 or 80) that has least interference. This option is available only when you select 11ac or 11ax in the 802.11 Mode field. |
Channel Selection | This is the radio channel which the signal will use for broadcasting by this radio profile. • DCS: Choose Dynamic Channel Selection to have the Zyxel Device choose a radio channel that has least interference. • Manual: Choose from the available radio channels in the list. If your Zyxel Device is outdoor type, be sure to choose non-indoors channels. |
Enable DCS Client Aware | Select this to have the Zyxel Device switch channels only when there are no clients connected to it. If there is a client connected, the Zyxel Device will not switch channels but generate a log. The Zyxel Device tries to scan and switch channels again at the end of the specified time interval or at the scheduled time. If you disable this then the Zyxel Device switches channels immediately regardless of any client connections. In this instance, clients that are connected to the Zyxel Device when it switches channels are dropped. |
Enable DCS Client Aware | This field is available when you set Channel Selection to DCS. Select this to have the Zyxel Device switch channels only when there are no clients connected to it. If there is a client connected, the Zyxel Device will not switch channels but generate a log. The Zyxel Device tries to scan and switch channels again at the end of the specified time interval or at the scheduled time. If you disable this then the Zyxel Device switches channels immediately regardless of any client connections. In this instance, clients that are connected to the Zyxel Device when it switches channels are dropped. |
2.4 GHz Channel Selection Method | This field is available when you set Channel Selection to DCS. Select how you want to specify the channels the Zyxel Device switches between for 2.4 GHz operation. Select auto to have the Zyxel Device display a 2.4 GHz Channel Deployment field you can use to limit channel switching to 3 or 4 channels. Select manual to select the individual channels the Zyxel Device switches between. |
Channel ID | This field is available only when you set Channel Selection to DCS and set 2.4 GHz Channel Selection Method to manual. Select the channels that you want the Zyxel Device to use. |
2.4 GHz Channel Deployment | This is available when you set Channel Selection to DCS and the 2.4 GHz Channel Selection Method is set to auto. Select Three-Channel Deployment to limit channel switching to channels 1,6, and 11, the three channels that are sufficiently attenuated to have almost no impact on one another. In other words, this allows you to minimize channel interference by limiting channel-hopping to these three “safe” channels. Select Four-Channel Deployment to limit channel switching to four channels. Depending on the country domain, if the only allowable channels are 1-11 then the Zyxel Device uses channels 1, 4, 7, 11 in this configuration; otherwise, the Zyxel Device uses channels 1, 5, 9, 13 in this configuration. Four channel deployment expands your pool of possible channels while keeping the channel interference to a minimum. |
Enable 5 GHz DFS Aware | This field is available only when you select 5G in the 802.11 Band field, set Channel Selection to DCS and set 5 GHz Channel Selection Method to auto. Select this if your APs are operating in an area known to have RADAR devices. This allows the Zyxel Device to downgrade its frequency to below 5 GHz in the event RADAR signal is detected, thus preventing it from interfering with that signal. Enabling this forces the AP to select a non-DFS channel. |
5 GHz Channel Selection Method | Select how you want to specify the channels the Zyxel Device switches between for 5 GHz operation. Select Auto to have the Zyxel Device automatically select the best channel. Select manual to select the individual channels the Zyxel Device switches between. |
Channel ID | This field is available only when you set Channel Selection to DCS and set 5 GHz Channel Selection Method to manual. Select the channels that you want the Zyxel Device to use. |
Time Interval | Select this option to have the Zyxel Device survey the other APs within its broadcast radius at the end of the specified time interval. |
DCS Time Interval | This field is available when you set Channel Selection to DCS and select the Time Interval option. Enter a number of minutes. This regulates how often the Zyxel Device surveys the other APs within its broadcast radius. If the channel on which it is currently broadcasting suddenly comes into use by another AP, the Zyxel Device will then dynamically select the next available clean channel or a channel with lower interference. |
Schedule | Select this option to have the Zyxel Device survey the other APs within its broadcast radius at a specific time on selected days of the week. |
Start Time | Specify the time of the day (in 24-hour format) to have the Zyxel Device use DCS to automatically scan and find a less-used channel. |
Week Days | Select each day of the week to have the Zyxel Device use DCS to automatically scan and find a less-used channel. |
Advanced Settings | |
Guard Interval | This field is available only when the channel width is 20/40MHz or 20/40/80MHz and the 802.11 Mode is either 11n or 11ac. Set the guard interval for this radio profile to either short or long. The guard interval is the gap introduced between data transmission from users in order to reduce interference. Reducing the interval increases data transfer rates but also increases interference. Increasing the interval reduces data transfer rates but also reduces interference. |
Enable A-MPDU Aggregation | This field is not available when you set 802.11 Mode to 11a or 11b/g. Select this to enable A-MPDU aggregation. Message Protocol Data Unit (MPDU) aggregation collects Ethernet frames along with their 802.11n headers and wraps them in a 802.11n MAC header. This method is useful for increasing bandwidth throughput in environments that are prone to high error rates. |
Enable A-MSDU Aggregation | This field is not available when you set 802.11 Mode to 11a or 11b/g. Select this to enable A-MSDU aggregation. Mac Service Data Unit (MSDU) aggregation collects Ethernet frames without any of their 802.11n headers and wraps the header-less payload in a single 802.11n MAC header. This method is useful for increasing bandwidth throughput. It is also more efficient than A-MPDU except in environments that are prone to high error rates. |
RTS/CTS Threshold | Use RTS/CTS to reduce data collisions on the wireless network if you have wireless clients that are associated with the same AP but out of range of one another. When enabled, a wireless client sends an RTS (Request To Send) and then waits for a CTS (Clear To Send) before it transmits. This stops wireless clients from transmitting packets at the same time (and causing data collisions). A wireless client sends an RTS for all packets larger than the number (of bytes) that you enter here. Set the RTS/CTS equal to or higher than the fragmentation threshold to turn RTS/CTS off. |
Beacon Interval | When a wirelessly networked device sends a beacon, it includes with it a beacon interval. This specifies the time period before the Zyxel Device sends the beacon again. The interval tells receiving devices on the network how long they can wait in low-power mode before waking up to handle the beacon. A high value helps save current consumption of the access point. |
DTIM | Delivery Traffic Indication Message (DTIM) is the time period after which broadcast and multicast packets are transmitted to mobile clients in the Active Power Management mode. A high DTIM value can cause clients to lose connectivity with the network. This value can be set from 1 to 255. |
Enable Signal Threshold | Select the check box to use the signal threshold to ensure wireless clients receive good throughput. This allows only wireless clients with a strong signal to connect to the AP. Clear the check box to not require wireless clients to have a minimum signal strength to connect to the AP. |
Station Signal Threshold | Set a minimum client signal strength. A wireless client is allowed to connect to the AP only when its signal strength is stronger than the specified threshold. -20 dBm is the strongest signal you can require and -105 is the weakest. |
Disassociate Station Threshold | Set a minimum kick-off signal strength. When a wireless client’s signal strength is lower than the specified threshold, the Zyxel Device disconnects the wireless client from the AP. -20 dBm is the strongest signal you can require and -105 is the weakest. |
Allow Station Connection after Multiple Retries | Select this option to allow a wireless client to try to associate with the AP again after it is disconnected due to weak signal strength. |
Station Retry Count | Set the maximum number of times a wireless client can attempt to re-connect to the AP |
Allow 802.11n/ac/ax stations only | Select this option to allow only 802.11 n/ac/ax clients to connect, and reject 802.11a/b/g clients. |
Blacklist DFS channels in presence of radar | This field is available if 802.11 Band is set to 5G and Channel Selection is set to DCS. Enable this to temporarily blacklist the wireless channels in the Dynamic Frequency Selection (DFS) range whenever a radar signal is detected by the Zyxel Device. |
Enable 802.11d | Clear the checkbox to prevent the AP from broadcasting a country code, also called a country Information Element (IE), in beacon frames. This makes the AP incompatible with 802.11d networks and devices. 802.11d is a WiFi network specification that allows the AP to broadcast a country code to WiFi client. The country code indicates where the AP is located. If WiFi clients are unable to connect to the AP due to an incompatible country code, you should disable 802.11d. |
Multicast Settings | |
Transmission Mode | Specify how the Zyxel Device handles wireless multicast traffic. Select Multicast to Unicast to broadcast wireless multicast traffic to all of the wireless clients as unicast traffic. Unicast traffic dynamically changes the data rate based on the application’s bandwidth requirements. The retransmit mechanism of unicast traffic provides more reliable transmission of the multicast traffic, although it also produces duplicate packets. Select Fixed Multicast Rate to send multicast traffic to all wireless clients at a single data rate. You must know the multicast application’s bandwidth requirements and set it in the following field. |
Multicast Rate(Mbps) | If you set Transmission Mode to Fixed Multicast Rate, select a data rate at which the Zyxel Device transmits multicast packets to wireless clients. For example, to deploy 4 Mbps video, select a fixed multicast rate higher than 4 Mbps. |
Minimum WLAN Rate Control Setting | Sets the minimum data rate that 2.4Ghz WiFi clients can connect at, in Mbps. At the time of write, allowed values are: 1, 2, 5. 5, 6, 9, 11, 12, 18, 24, 36, 48, 54. Sets the minimum data rate that 5Ghz WiFi clients can connect at, in Mbps. At the time of write, allowed values are: 6, 9, 12, 18, 24, 36, 48, 54. Increasing the minimum data rate can reduce network overhead and improve WiFi network performance in high density environments. However, WiFi clients that do not support the minimum data rate will not be able to connect to the AP. |
OK | Click OK to save your changes back to the Zyxel Device. |
Cancel | Click Cancel to exit this screen without saving your changes. |
SSID
The SSID screens allow you to configure three different types of profiles for your networked APs: an SSID list, which can assign specific SSID configurations to your APs; a security list, which can assign specific encryption methods to the APs when allowing wireless clients to connect to them; and a MAC filter list, which can limit connections to an AP based on wireless clients MAC addresses.
SSID List
This screen allows you to create and manage SSID configurations that can be used by the APs. An SSID, or Service Set IDentifier, is basically the name of the wireless network to which a wireless client can connect. The SSID appears as readable text to any device capable of scanning for wireless frequencies (such as the WiFi adapter in a laptop), and is displayed as the wireless network name when a person makes a connection to it.
Note: You cannot add or remove an SSID profile after running the setup wizard.
Label | Description |
|---|---|
Add | Click this to add a new SSID profile. This button is not available after you configure the Zyxel Deviceusing the wizard. |
Edit | Click this to edit the selected SSID profile. |
Remove | Click this to remove the selected SSID profile. This button is not available after you configure the Zyxel Deviceusing the wizard. |
Object Reference | Click this to view which other objects are linked to the selected SSID profile (for example, radio profile). |
# | This field is a sequential value, and it is not associated with a specific user. |
Profile Name | This field indicates the name assigned to the SSID profile. |
SSID | This field indicates the SSID name as it appears to wireless clients. |
Security Profile | This field indicates which (if any) security profile is associated with the SSID profile. |
QoS | This field indicates the QoS type associated with the SSID profile. |
MAC Filtering Profile | This field indicates which (if any) MAC filter Profile is associated with the SSID profile. |
Layer-2 Isolation Profile | This field indicates which (if any) layer-2 isolation Profile is associated with the SSID profile. |
VLAN ID | This field indicates the VLAN ID associated with the SSID profile. |
Add/Edit SSID Profile
This screen allows you to create a new SSID profile or edit an existing one.
Label | Description |
|---|---|
Create new Object | Select an object type from the list to create a new one associated with this SSID profile. |
Profile Name | Enter up to 31 alphanumeric characters for the profile name. This name is only visible in the Web Configurator and is only for management purposes. Spaces and underscores are allowed. |
SSID | Enter the SSID name for this profile. This is the name visible on the network to wireless clients. Enter up to 32 characters, spaces and underscores are allowed. |
Security Profile | Select a security profile from this list to associate with this SSID. If none exist, you can use the Create new Object menu to create one. |
MAC Filtering Profile | Select a MAC filtering profile from the list to associate with this SSID. If none exist, you can use the Create new Object menu to create one. MAC filtering allows you to limit the wireless clients connecting to your network through a particular SSID by wireless client MAC addresses. Any clients that have MAC addresses not in the MAC filtering profile of allowed addresses are denied connections. The disable setting means no MAC filtering is used. |
QoS | Select a Quality of Service (QoS) access category to associate with this SSID. Access categories minimize the delay of data packets across a wireless network. Certain categories, such as video or voice, are given a higher priority due to the time sensitive nature of their data packets. QoS access categories are as follows: disable: Turns off QoS for this SSID. All data packets are treated equally and not tagged with access categories. WMM: Enables automatic tagging of data packets. The Zyxel Device assigns access categories to the SSID by examining data as it passes through it and making a best guess effort. If something looks like video traffic, for instance, it is tagged as such. WMM_VOICE: All wireless traffic to the SSID is tagged as voice data. This is recommended if an SSID is used for activities like placing and receiving VoIP phone calls. WMM_VIDEO: All wireless traffic to the SSID is tagged as video data. This is recommended for activities like video conferencing. WMM_BEST_EFFORT: All wireless traffic to the SSID is tagged as “best effort,” meaning the data travels the best route it can without displacing higher priority traffic. This is good for activities that do not require the best bandwidth throughput, such as surfing the Internet. WMM_BACKGROUND: All wireless traffic to the SSID is tagged as low priority or “background traffic”, meaning all other access categories take precedence over this one. If traffic from an SSID does not have strict throughput requirements, then this access category is recommended. For example, an SSID that only has network printers connected to it. |
Rate Limiting | |
Downlink | Define the maximum incoming transmission data rate (either in mbps or kbps) on a per-station basis. |
Uplink | Define the maximum outgoing transmission data rate (either in mbps or kbps) on a per-station basis. |
VLAN ID | Enter a VLAN ID for the Zyxel Device to use to tag traffic originating from this SSID. |
Hidden SSID | Select this if you want to “hide” your SSID from wireless clients. This tells any wireless clients in the vicinity of the AP using this SSID profile not to display its SSID name as a potential connection. Not all wireless clients respect this flag and display it anyway. When a SSID is “hidden” and a wireless client cannot see it, the only way you can connect to the SSID is by manually entering the SSID name in your wireless connection setup screen(s) (these vary by client, client connectivity software, and operating system). |
Enable Intra-BSS Traffic Blocking | Select this option to prevent crossover traffic from on the Zyxel Device. |
Enable U-APSD | Select this option to enable Unscheduled Automatic Power Save Delivery (U-APSD), which is also known as WMM-Power Save. This helps increase battery life for battery-powered wireless clients connected to the Zyxel Device using this SSID profile. |
802.11k/v Assisted Roaming | Select this option to enable IEEE 802.11k/v assisted roaming on the Zyxel Device. When the connected clients request 802.11k neighbor lists, the Zyxel Device will response with a list of neighbor APs that can be candidates for roaming. |
Schedule SSID | Select this option and set whether the SSID is enabled or disabled on each day of the week. You also need to select the hour and minute (in 24-hour format) to specify the time period of each day during which the SSID is enabled/enabled. |
OK | Click OK to save your changes back to the Zyxel Device. |
Cancel | Click Cancel to exit this screen without saving your changes. |
Security List
This screen allows you to manage wireless security configurations that can be used by your SSIDs. Wireless security is implemented strictly between the AP broadcasting the SSID and the stations that are connected to it.
Note: You can have a maximum of 32 security profiles on the Zyxel Device.
Label | Description |
|---|---|
Add | Click this to add a new security profile. |
Edit | Click this to edit the selected security profile. |
Remove | Click this to remove the selected security profile. |
Object Reference | Click this to view which other objects are linked to the selected security profile (for example, SSID profile). |
# | This field is a sequential value, and it is not associated with a specific user. |
Profile Name | This field indicates the name assigned to the security profile. |
Security Mode | This field indicates this profile’s security mode (if any). |
Add/Edit Security Profile
This screen allows you to create a new security profile or edit an existing one.
These screens’ options change based on the Security Mode selected. The following table describes the labels in this screen.
Label | Description |
|---|---|
General Settings | |
Profile Name | Enter up to 31 alphanumeric characters for the profile name. This name is only visible in the Web Configurator and is only for management purposes. Spaces and underscores are allowed. |
Security Mode | Select a security mode from the list: none, enhanced-open, wep, wpa2, wpa2-mix or wpa3. enhanced-open uses Opportunistic Wireless Encryption (OWE) which encrypts the wireless connection when possible. |
Authentication Settings | |
Enterprise | Select this to enable 802.1X secure authentication with a RADIUS server. |
ReAuthentication Timer | Enter the interval (in seconds) between authentication requests. Enter a 0 for unlimited time. |
Advance | |
Idle Timeout | Enter the idle interval (in seconds) that a client can be idle before authentication is discontinued. |
Radius Settings | |
Primary / Secondary Radius Server Activate | Select this to have the Zyxel Device use the specified RADIUS server. |
Radius Server IP Address | Enter the IP address of the RADIUS server to be used for authentication. |
Radius Server Port | Enter the port number of the RADIUS server to be used for authentication. |
Radius Server Secret | Enter the shared secret password of the RADIUS server to be used for authentication. |
Primary / Secondary Accounting Server Activate | Select the check box to enable user accounting through an external authentication server. |
Accounting Server IP Address | Enter the IP address of the external accounting server in dotted decimal notation. |
Accounting Server Port | Enter the port number of the external accounting server. The default port number is 1813. You need not change this value unless your network administrator instructs you to do so with additional information. |
Accounting Share Secret | Enter a password (up to 128 alphanumeric characters) as the key to be shared between the external accounting server and the Zyxel Device. The key must be the same on the external accounting server and your Zyxel Device. The key is not sent over the network. |
Accounting Interim Update | This field is available only when you enable user accounting through an external authentication server. Select this to have the Zyxel Device send subscriber status updates to the accounting server at the interval you specify. |
Interim Update Interval | Specify the time interval for how often the Zyxel Device is to send a subscriber status update to the accounting server. |
General Server Settings | |
NAS IP Address | If the RADIUS server requires the Zyxel Device to provide the NAS (Network Access Server) IP address attribute, enter it here. |
NAS Identifier | If the RADIUS server requires the Zyxel Device to provide the NAS (Network Access Server) identifier attribute, enter it here. The NAS identifier is to identify the source of access request. It could be the NAS’s fully qualified domain name. |
OK | Click OK to save your changes back to the Zyxel Device. |
Cancel | Click Cancel to exit this screen without saving your changes. |
The following table describes the labels in this screen.
Label | Description |
|---|---|
General Settings | |
Profile Name | Enter up to 31 alphanumeric characters for the profile name. This name is only visible in the Web Configurator and is only for management purposes. Spaces and underscores are allowed. |
Security Mode | Select a security mode from the list: none, enhanced-open, wep, wpa2, wpa2-mix or wpa3. enhanced-open uses Opportunistic Wireless Encryption (OWE) which encrypts the wireless connection when possible. |
Authentication Settings | |
Transition Mode | This option only displays if you set the Security Mode to wpa3 or enhanced-open. This option is always enabled for backwards compatibility. This creates two virtual APs (VAPs) with a primary (wpa3 or enhanced-open) and fallback (wpa2 or none) security method. |
Advance | |
Idle Timeout | Enter the idle interval (in seconds) that a client can be idle before authentication is discontinued. |
Management Frame Protection | This field is available only when you select wpa2 in the Security Mode field and set Cipher Type to aes. Data frames in 802.11 WLANs can be encrypted and authenticated with WEP, WPA or WPA2. But 802.11 management frames, such as beacon/probe response, association request, association response, de-authentication and disassociation are always unauthenticated and unencrypted. IEEE 802.11w Protected Management Frames allows APs to use the existing security mechanisms (encryption and authentication methods defined in IEEE 802.11i WPA/WPA2) to protect management frames. This helps prevent wireless DoS attacks. Select the check box to enable management frame protection (MFP) to add security to 802.11 management frames. This option is always enabled if you select enhanced-open or WPA3 as the Security Mode. If Optional is selected, WiFi clients will not be not required to support MFP. Management frames will be encrypted if the clients support MFP. If Required is selected, WiFi clients must support MFP in order to join the Zyxel Device’s WiFi network. |
OK | Click OK to save your changes back to the Zyxel Device. |
Cancel | Click Cancel to exit this screen without saving your changes. |
The following table describes the labels in this screen.
Label | Description |
|---|---|
General Settings | |
Profile Name | Enter up to 31 alphanumeric characters for the profile name. This name is only visible in the Web Configurator and is only for management purposes. Spaces and underscores are allowed. |
Security Mode | Select a security mode from the list: none, enhanced-open, wep, wpa2, wpa2-mix or wpa3. enhanced-open uses Opportunistic Wireless Encryption (OWE) which encrypts the wireless connection when possible. |
Authentication Settings | |
Enterprise | Select this to enable 802.1X secure authentication with a RADIUS server. |
ReAuthentication Timer | Enter the interval (in seconds) between authentication requests. Enter a 0 for unlimited time. |
Authentication Type | Select a WEP authentication method. Choices are Open or Share key. |
Key Length | Select the bit-length of the encryption key to be used in WEP connections. If you select WEP-64: • Enter 10 hexadecimal digits in the range of “A-F”, “a-f” and “0-9” (for example, 0x11AA22BB33) for each Key used. or • Enter 5 ASCII characters (case sensitive) ranging from “a-z”, “A-Z” and “0-9” (for example, MyKey) for each Key used. If you select WEP-128: • Enter 26 hexadecimal digits in the range of “A-F”, “a-f” and “0-9” (for example, 0x00112233445566778899AABBCC) for each Key used. or • Enter 13 ASCII characters (case sensitive) ranging from “a-z”, “A-Z” and “0-9” (for example, MyKey12345678) for each Key used. |
Key 1~4 | Based on your Key Length selection, enter the appropriate length hexadecimal or ASCII key. |
Advance | |
Idle Timeout | Enter the idle interval (in seconds) that a client can be idle before authentication is discontinued. |
Radius Settings | |
Primary / Secondary Radius Server Activate | Select this to have the Zyxel Device use the specified RADIUS server. |
Radius Server IP Address | Enter the IP address of the RADIUS server to be used for authentication. |
Radius Server Port | Enter the port number of the RADIUS server to be used for authentication. |
Radius Server Secret | Enter the shared secret password of the RADIUS server to be used for authentication. |
Primary / Secondary Accounting Server Activate | Select the check box to enable user accounting through an external authentication server. |
Accounting Server IP Address | Enter the IP address of the external accounting server in dotted decimal notation. |
Accounting Server Port | Enter the port number of the external accounting server. The default port number is 1813. You need not change this value unless your network administrator instructs you to do so with additional information. |
Accounting Share Secret | Enter a password (up to 128 alphanumeric characters) as the key to be shared between the external accounting server and the Zyxel Device. The key must be the same on the external accounting server and your Zyxel Device. The key is not sent over the network. |
Accounting Interim Update | This field is available only when you enable user accounting through an external authentication server. Select this to have the Zyxel Device send subscriber status updates to the accounting server at the interval you specify. |
Interim Update Interval | Specify the time interval for how often the Zyxel Device is to send a subscriber status update to the accounting server. |
General Server Settings | |
NAS IP Address | If the RADIUS server requires the Zyxel Device to provide the NAS (Network Access Server) IP address attribute, enter it here. |
NAS Identifier | If the RADIUS server requires the Zyxel Device to provide the NAS (Network Access Server) identifier attribute, enter it here. The NAS identifier is to identify the source of access request. It could be the NAS’s fully qualified domain name. |
OK | Click OK to save your changes back to the Zyxel Device. |
Cancel | Click Cancel to exit this screen without saving your changes. |
The following table describes the labels in this screen.
Label | Description |
|---|---|
General Settings | |
Profile Name | Enter up to 31 alphanumeric characters for the profile name. This name is only visible in the Web Configurator and is only for management purposes. Spaces and underscores are allowed. |
Security Mode | Select a security mode from the list: none, enhanced-open, wep, wpa2, wpa2-mix or wpa3. enhanced-open uses Opportunistic Wireless Encryption (OWE) which encrypts the wireless connection when possible. |
Authentication Settings | |
Enterprise | Select this to enable 802.1X secure authentication with a RADIUS server. |
ReAuthentication Timer | Enter the interval (in seconds) between authentication requests. Enter a 0 for unlimited time. |
Personal | This field is available when you select the wpa2, wpa2-mix or wpa3 security mode. Select this option to use a Pre-Shared Key (PSK) with WPA2 encryption or Simultaneous Authentication of Equals (SAE) with WPA3 encryption. |
Pre-Shared Key | Enter a pre-shared key of between 8 and 63 case-sensitive ASCII characters (including spaces and symbols) or 64 hexadecimal characters. |
Advance | |
Cipher Type | Select an encryption cipher type from the list. • auto - This automatically chooses the best available cipher based on the cipher in use by the wireless client that is attempting to make a connection. • aes - This is the Advanced Encryption Standard encryption method. It is a more recent development over TKIP and considerably more robust. Not all wireless clients may support this. |
Idle Timeout | Enter the idle interval (in seconds) that a client can be idle before authentication is discontinued. |
Group Key Update Timer | Enter the interval (in seconds) at which the AP updates the group WPA2 encryption key. |
Pre-Authentication | Select Enable to allow pre-authentication. Otherwise, select Disable. |
Management Frame Protection | This field is available only when you select wpa2 in the Security Mode field and set Cipher Type to aes. Data frames in 802.11 WLANs can be encrypted and authenticated with WEP, WPA or WPA2. But 802.11 management frames, such as beacon/probe response, association request, association response, de-authentication and disassociation are always unauthenticated and unencrypted. IEEE 802.11w Protected Management Frames allows APs to use the existing security mechanisms (encryption and authentication methods defined in IEEE 802.11i WPA/WPA2) to protect management frames. This helps prevent wireless DoS attacks. Select the check box to enable management frame protection (MFP) to add security to 802.11 management frames. This option is always enabled if you select enhanced-open or WPA3 as the Security Mode. If Optional is selected, WiFi clients will not be not required to support MFP. Management frames will be encrypted if the clients support MFP. If Required is selected, WiFi clients must support MFP in order to join the Zyxel Device’s WiFi network. |
Radius Settings | |
Primary / Secondary Radius Server Activate | Select this to have the Zyxel Device use the specified RADIUS server. |
Radius Server IP Address | Enter the IP address of the RADIUS server to be used for authentication. |
Radius Server Port | Enter the port number of the RADIUS server to be used for authentication. |
Radius Server Secret | Enter the shared secret password of the RADIUS server to be used for authentication. |
Primary / Secondary Accounting Server Activate | Select the check box to enable user accounting through an external authentication server. |
Accounting Server IP Address | Enter the IP address of the external accounting server in dotted decimal notation. |
Accounting Server Port | Enter the port number of the external accounting server. The default port number is 1813. You need not change this value unless your network administrator instructs you to do so with additional information. |
Accounting Share Secret | Enter a password (up to 128 alphanumeric characters) as the key to be shared between the external accounting server and the Zyxel Device. The key must be the same on the external accounting server and your Zyxel Device. The key is not sent over the network. |
Accounting Interim Update | This field is available only when you enable user accounting through an external authentication server. Select this to have the Zyxel Device send subscriber status updates to the accounting server at the interval you specify. |
Interim Update Interval | Specify the time interval for how often the Zyxel Device is to send a subscriber status update to the accounting server. |
General Server Settings | |
NAS IP Address | If the RADIUS server requires the Zyxel Device to provide the NAS (Network Access Server) IP address attribute, enter it here. |
NAS Identifier | If the RADIUS server requires the Zyxel Device to provide the NAS (Network Access Server) identifier attribute, enter it here. The NAS identifier is to identify the source of access request. It could be the NAS’s fully qualified domain name. |
OK | Click OK to save your changes back to the Zyxel Device. |
Cancel | Click Cancel to exit this screen without saving your changes. |
The following table describes the labels in this screen.
Label | Description |
|---|---|
General Settings | |
Profile Name | Enter up to 31 alphanumeric characters for the profile name. This name is only visible in the Web Configurator and is only for management purposes. Spaces and underscores are allowed. |
Security Mode | Select a security mode from the list: none, enhanced-open, wep, wpa2, wpa2-mix or wpa3. enhanced-open uses Opportunistic Wireless Encryption (OWE) which encrypts the wireless connection when possible. |
Authentication Settings | |
Enterprise | Select this to enable 802.1X secure authentication with a RADIUS server. |
ReAuthentication Timer | Enter the interval (in seconds) between authentication requests. Enter a 0 for unlimited time. |
Personal | This field is available when you select the wpa2, wpa2-mix or wpa3 security mode. Select this option to use a Pre-Shared Key (PSK) with WPA2 encryption or Simultaneous Authentication of Equals (SAE) with WPA3 encryption. |
Pre-Shared Key | Enter a pre-shared key of between 8 and 63 case-sensitive ASCII characters (including spaces and symbols) or 64 hexadecimal characters. |
Advance | |
Cipher Type | Select an encryption cipher type from the list. • auto - This automatically chooses the best available cipher based on the cipher in use by the wireless client that is attempting to make a connection. • aes - This is the Advanced Encryption Standard encryption method. It is a more recent development over TKIP and considerably more robust. Not all wireless clients may support this. |
Idle Timeout | Enter the idle interval (in seconds) that a client can be idle before authentication is discontinued. |
Group Key Update Timer | Enter the interval (in seconds) at which the AP updates the group WPA2 encryption key. |
Pre-Authentication | Select Enable to allow pre-authentication. Otherwise, select Disable. |
Radius Settings | |
Primary / Secondary Radius Server Activate | Select this to have the Zyxel Device use the specified RADIUS server. |
Radius Server IP Address | Enter the IP address of the RADIUS server to be used for authentication. |
Radius Server Port | Enter the port number of the RADIUS server to be used for authentication. |
Radius Server Secret | Enter the shared secret password of the RADIUS server to be used for authentication. |
Primary / Secondary Accounting Server Activate | Select the check box to enable user accounting through an external authentication server. |
Accounting Server IP Address | Enter the IP address of the external accounting server in dotted decimal notation. |
Accounting Server Port | Enter the port number of the external accounting server. The default port number is 1813. You need not change this value unless your network administrator instructs you to do so with additional information. |
Accounting Share Secret | Enter a password (up to 128 alphanumeric characters) as the key to be shared between the external accounting server and the Zyxel Device. The key must be the same on the external accounting server and your Zyxel Device. The key is not sent over the network. |
Accounting Interim Update | This field is available only when you enable user accounting through an external authentication server. Select this to have the Zyxel Device send subscriber status updates to the accounting server at the interval you specify. |
Interim Update Interval | Specify the time interval for how often the Zyxel Device is to send a subscriber status update to the accounting server. |
General Server Settings | |
NAS IP Address | If the RADIUS server requires the Zyxel Device to provide the NAS (Network Access Server) IP address attribute, enter it here. |
NAS Identifier | If the RADIUS server requires the Zyxel Device to provide the NAS (Network Access Server) identifier attribute, enter it here. The NAS identifier is to identify the source of access request. It could be the NAS’s fully qualified domain name. |
OK | Click OK to save your changes back to the Zyxel Device. |
Cancel | Click Cancel to exit this screen without saving your changes. |
The following table describes the labels in this screen.
Label | Description |
|---|---|
General Settings | |
Profile Name | Enter up to 31 alphanumeric characters for the profile name. This name is only visible in the Web Configurator and is only for management purposes. Spaces and underscores are allowed. |
Security Mode | Select a security mode from the list: none, enhanced-open, wep, wpa2, wpa2-mix or wpa3. enhanced-open uses Opportunistic Wireless Encryption (OWE) which encrypts the wireless connection when possible. |
Authentication Settings | |
Enterprise | Select this to enable 802.1X secure authentication with a RADIUS server. |
ReAuthentication Timer | Enter the interval (in seconds) between authentication requests. Enter a 0 for unlimited time. |
Personal | This field is available when you select the wpa2, wpa2-mix or wpa3 security mode. Select this option to use a Pre-Shared Key (PSK) with WPA2 encryption or Simultaneous Authentication of Equals (SAE) with WPA3 encryption. |
Pre-Shared Key | Enter a pre-shared key of between 8 and 63 case-sensitive ASCII characters (including spaces and symbols) or 64 hexadecimal characters. |
Transition Mode | This option only displays if you set the Security Mode to wpa3 or enhanced-open. This option is always enabled for backwards compatibility. This creates two virtual APs (VAPs) with a primary (wpa3 or enhanced-open) and fallback (wpa2 or none) security method. |
Advance | |
Idle Timeout | Enter the idle interval (in seconds) that a client can be idle before authentication is discontinued. |
Group Key Update Timer | Enter the interval (in seconds) at which the AP updates the group WPA2 encryption key. |
Pre-Authentication | Select Enable to allow pre-authentication. Otherwise, select Disable. |
Management Frame Protection | This field is available only when you select wpa2 in the Security Mode field and set Cipher Type to aes. Data frames in 802.11 WLANs can be encrypted and authenticated with WEP, WPA or WPA2. But 802.11 management frames, such as beacon/probe response, association request, association response, de-authentication and disassociation are always unauthenticated and unencrypted. IEEE 802.11w Protected Management Frames allows APs to use the existing security mechanisms (encryption and authentication methods defined in IEEE 802.11i WPA/WPA2) to protect management frames. This helps prevent wireless DoS attacks. Select the check box to enable management frame protection (MFP) to add security to 802.11 management frames. This option is always enabled if you select enhanced-open or WPA3 as the Security Mode. If Optional is selected, WiFi clients will not be not required to support MFP. Management frames will be encrypted if the clients support MFP. If Required is selected, WiFi clients must support MFP in order to join the Zyxel Device’s WiFi network. |
Radius Settings | |
Primary / Secondary Radius Server Activate | Select this to have the Zyxel Device use the specified RADIUS server. |
Radius Server IP Address | Enter the IP address of the RADIUS server to be used for authentication. |
Radius Server Port | Enter the port number of the RADIUS server to be used for authentication. |
Radius Server Secret | Enter the shared secret password of the RADIUS server to be used for authentication. |
Primary / Secondary Accounting Server Activate | Select the check box to enable user accounting through an external authentication server. |
Accounting Server IP Address | Enter the IP address of the external accounting server in dotted decimal notation. |
Accounting Server Port | Enter the port number of the external accounting server. The default port number is 1813. You need not change this value unless your network administrator instructs you to do so with additional information. |
Accounting Share Secret | Enter a password (up to 128 alphanumeric characters) as the key to be shared between the external accounting server and the Zyxel Device. The key must be the same on the external accounting server and your Zyxel Device. The key is not sent over the network. |
Accounting Interim Update | This field is available only when you enable user accounting through an external authentication server. Select this to have the Zyxel Device send subscriber status updates to the accounting server at the interval you specify. |
Interim Update Interval | Specify the time interval for how often the Zyxel Device is to send a subscriber status update to the accounting server. |
General Server Settings | |
NAS IP Address | If the RADIUS server requires the Zyxel Device to provide the NAS (Network Access Server) IP address attribute, enter it here. |
NAS Identifier | If the RADIUS server requires the Zyxel Device to provide the NAS (Network Access Server) identifier attribute, enter it here. The NAS identifier is to identify the source of access request. It could be the NAS’s fully qualified domain name. |
OK | Click OK to save your changes back to the Zyxel Device. |
Cancel | Click Cancel to exit this screen without saving your changes. |
MAC Filter List
This screen allows you to create and manage security configurations that can be used by your SSIDs.
Note: You can have a maximum of 32 MAC filtering profiles on the Zyxel Device.
Label | Description |
|---|---|
Add | Click this to add a new MAC filtering profile. |
Edit | Click this to edit the selected MAC filtering profile. |
Remove | Click this to remove the selected MAC filtering profile. |
Object Reference | Click this to view which other objects are linked to the selected MAC filtering profile (for example, SSID profile). |
# | This field is a sequential value, and it is not associated with a specific user. |
Profile Name | This field indicates the name assigned to the MAC filtering profile. |
Filter Action | This field indicates this profile’s filter action (if any). |
Add/Edit MAC Filter Profile
This screen allows you to create a new MAC filtering profile or edit an existing one.
Note: Each MAC filtering profile can include a maximum of 512 MAC addresses.
Label | Description |
|---|---|
Profile Name | Enter up to 31 alphanumeric characters for the profile name. This name is only visible in the Web Configurator and is only for management purposes. Spaces and underscores are allowed. |
Filter Action | Select allow to permit the wireless client with the MAC addresses in this profile to connect to the network through the associated SSID; select deny to block the wireless clients with the specified MAC addresses. |
Add | Click this to add a MAC address to the profile’s list. |
Edit | Click this to edit the selected MAC address in the profile’s list. |
Remove | Click this to remove the selected MAC address from the profile’s list. |
# | This field is a sequential value, and it is not associated with a specific user. |
MAC | This field specifies a MAC address associated with this profile. You can click the MAC address to make it editable. |
Description | This field displays a description for the MAC address associated with this profile. You can click the description to make it editable. Enter up to 60 characters, spaces and underscores allowed. |
OK | Click OK to save your changes back to the Zyxel Device. |
Cancel | Click Cancel to exit this screen without saving your changes. |
Layer-2 Isolation List
Layer-2 isolation is used to prevent wireless clients associated with your Zyxel Device from communicating with other wireless clients, APs, computers or routers in a network.
In the following example, layer-2 isolation is enabled on the Zyxel Device to allow a guest wireless client (A) to access the main network router (B). The router provides access to the Internet and the network printer (C) while preventing the client from accessing other computers and servers on the network. The client can communicate with other wireless clients only if Intra-BSS Traffic blocking is disabled.
Note: Intra-BSS Traffic Blocking is activated when you enable layer-2 isolation.
Layer-2 Isolation Application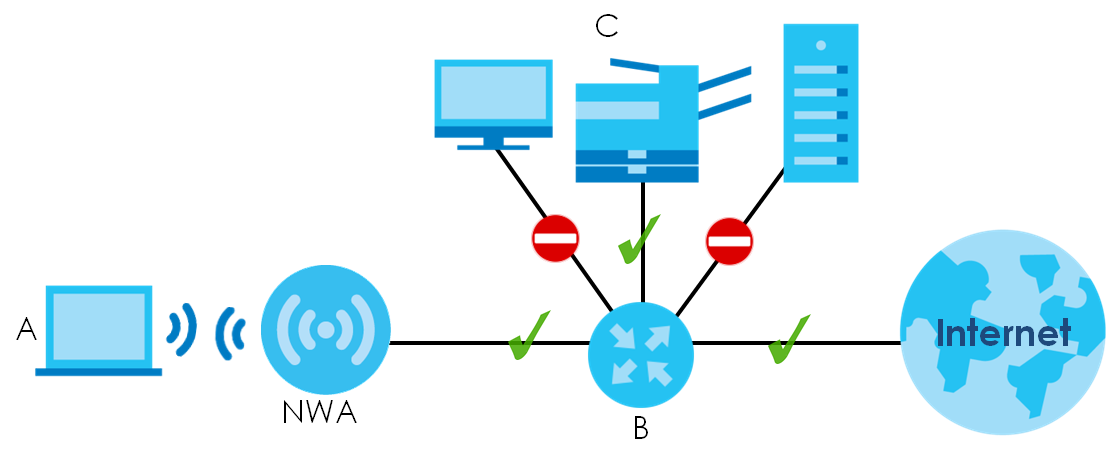
MAC addresses that are not listed in the layer-2 isolation table are blocked from communicating with the Zyxel Device’s wireless clients except for broadcast packets. Layer-2 isolation does not check the traffic between wireless clients that are associated with the same AP. Intra-BSS traffic allows wireless clients associated with the same AP to communicate with each other.
This screen allows you to specify devices you want the users on your wireless networks to access.
Label | Description |
|---|---|
Add | Click this to add a new layer-2 isolation profile. |
Edit | Click this to edit the selected layer-2 isolation profile. |
Remove | Click this to remove the selected layer-2 isolation profile. |
Object Reference | Click this to view which other objects are linked to the selected layer-2 isolation profile (for example, SSID profile). |
# | This field is a sequential value, and it is not associated with a specific user. |
Profile Name | This field indicates the name assigned to the layer-2 isolation profile. |
Add/Edit Layer-2 Isolation Profile
This screen allows you to create a new layer-2 isolation profile or edit an existing one. To access this screen, click the Add button or select a layer-2 isolation profile from the list and click the Edit button.
Note: You need to know the MAC address of each wireless client, AP, computer or router that you want to allow to communicate with the Zyxel Device's wireless clients.
Label | Description |
|---|---|
Profile Name | Enter up to 31 alphanumeric characters for the profile name. This name is only visible in the Web Configurator and is only for management purposes. Spaces and underscores are allowed. |
Add | Click this to add a MAC address to the profile’s list. |
Edit | Click this to edit the selected MAC address in the profile’s list. |
Remove | Click this to remove the selected MAC address from the profile’s list. |
# | This field is a sequential value, and it is not associated with a specific user. |
MAC | This field specifies a MAC address associated with this profile. You can click the MAC address to make it editable. |
Description | This field displays a description for the MAC address associated with this profile. You can click the description to make it editable. Enter up to 60 characters, spaces and underscores allowed. |
OK | Click OK to save your changes back to the Zyxel Device. |
Cancel | Click Cancel to exit this screen without saving your changes. |