IPSec VPN
Virtual Private Networks (VPN) Overview
A virtual private network (VPN) provides secure communications between sites without the expense of leased site-to-site lines. A secure VPN is a combination of tunneling, encryption, authentication, access control and auditing. It is used to transport traffic over the Internet or any insecure network that uses TCP/IP for communication.
IPSec VPN
Internet Protocol Security (IPSec) VPN connects IPSec routers or remote users using IPSec client software. This standards-based VPN offers flexible solutions for secure data communications across a public network. IPSec is built around a number of standardized cryptographic techniques to provide confidentiality, data integrity and authentication at the IP layer. The Zyxel Device can also combine multiple IPSec VPN connections into one secure network.
Internet Key Exchange (IKE): IKEv1 and IKEv2
The Zyxel Device supports IKEv1 and IKEv2 for IPv4 traffic. IKE (Internet Key Exchange) is a protocol used in setting up security associations that allows two parties to send data securely.
IKE uses certificates or pre-shared keys for authentication and a Diffie–Hellman key exchange to set up a shared session secret from which encryption keys are derived. A security policy for each peer must be manually created.
IPSec VPN consists of two phases: Phase 1 and Phase 2. Phase 1's purpose is to establish a secure authenticated communication channel by using the Diffie–Hellman key exchange algorithm to generate a shared secret key to encrypt IKE communications. This negotiation results in one single bi-directional ISAKMP Security Association (SA). The authentication can be performed using either pre-shared key (shared secret), signatures, or public key encryption. Phase 1 operates in either Main Mode or Aggressive Mode. Main Mode protects the identity of the peers, but Aggressive Mode does not.
During Phase 2, the remote IPSec routers use the secure channel established in Phase 1 to negotiate Security Associations for IPSec. The negotiation results in a minimum of two unidirectional security associations (one inbound and one outbound). Phase 2 uses Quick Mode (only). Quick mode occurs after IKE has established the secure tunnel in Phase 1. It negotiates a shared IPSec policy, derives shared secret keys used for the IPSec security algorithms, and establishes IPSec SAs. Quick mode is also used to renegotiate a new IPSec SA when the IPSec SA lifetime expires.
Some differences between IKEv1 and IKEv2 include:
• IKEv2 uses less bandwidth than IKEv1. IKEv2 uses one exchange procedure with 4 messages. IKEv1 uses two phases with Main Mode (9 messages) or Aggressive Mode (6 messages) in phase 1.
• IKEv2 supports Extended Authentication Protocol (EAP) authentication, and IKEv1 supports X-Auth. EAP is important when connecting to existing enterprise authentication systems.
• IKEv2 always uses NAT traversal and Dead Peer Detection (DPD), but they can be disabled in IKEv1 using Zyxel Device firmware (the default is on).
• Configuration payload (includes the IP address pool in the VPN setup data) is supported in IKEv2 (off by default), but not in IKEv1.
• Narrowed is supported in IKEv2, but not in IKEv1. Narrowed has the SA apply only to IP addresses in common between the Zyxel Device and the remote IPSec router.
• The IKEv2 protocol supports connectivity checks which is used to detect whether the tunnel is still up or not. If the check fails (the tunnel is down), IKEv2 can re-establish the connection automatically. The Zyxel Device uses firmware to perform connectivity checks when using IKEv1.
IPSec VPN Background Information
Here is some more detailed IPSec VPN background information.
IKE SA Overview
The IKE SA provides a secure connection between the Zyxel Device and remote IPSec router.
It takes several steps to establish an IKE SA. The negotiation mode determines how many. There are two negotiation modes for IKEv1--main mode and aggressive mode. Main mode provides better security, while aggressive mode is faster.
The Zyxel Device supports IKEv1 and IKEv2. See Virtual Private Networks (VPN) Overview for more information.
IP Addresses of the Zyxel Device and Remote IPSec Router
To set up an IKE SA, you have to specify the IP addresses of the Zyxel Device and remote IPSec router. You can usually enter a static IP address or a domain name for either or both IP addresses. Sometimes, your Zyxel Device might offer another alternative, such as using the IP address of a port or interface, as well.
IKE SA Proposal
The IKE SA proposal is used to identify the encryption algorithm, authentication algorithm, and Diffie-Hellman (DH) key group that the Zyxel Device and remote IPSec router use in the IKE SA. In main mode, this is done in steps 1 and 2.
The Zyxel Device sends one or more proposals to the remote IPSec router. (In some devices, you can only set up one proposal.) Each proposal consists of an encryption algorithm, authentication algorithm, and DH key group that the Zyxel Device wants to use in the IKE SA. The remote IPSec router selects an acceptable proposal and sends the accepted proposal back to the Zyxel Device. If the remote IPSec router rejects all of the proposals, the Zyxel Device and remote IPSec router cannot establish an IKE SA.
In most Zyxel Devices, you can select one of the following encryption algorithms for each proposal. The algorithms are listed in order from weakest to strongest.
• Data Encryption Standard (DES) is a widely used method of data encryption. It applies a 56-bit key to each 64-bit block of data.
• Triple DES (3DES) is a variant of DES. It iterates three times with three separate keys, effectively tripling the strength of DES.
• Advanced Encryption Standard (AES) is a newer method of data encryption that also uses a secret key. AES applies a 128-bit key to 128-bit blocks of data. It is faster than 3DES.
Some Zyxel Devices also offer stronger forms of AES that apply 192-bit or 256-bit keys to 128-bit blocks of data.
In most Zyxel Devices, you can select one of the following authentication algorithms for each proposal. The algorithms are listed in order from weakest to strongest.
• MD5 (Message Digest 5) produces a 128-bit digest to authenticate packet data.
• SHA1 (Secure Hash Algorithm) produces a 160-bit digest to authenticate packet data.SHA256 (Secure Hash Algorithm) produces a 256-bit digest to authenticate packet data.SHA512 (Secure Hash Algorithm) produces a 512-bit digest to authenticate packet data.
Diffie-Hellman (DH) Key Exchange
The Zyxel Device and the remote IPSec router use DH public-key cryptography to establish a shared secret. The shared secret is then used to generate encryption keys for the IKE SA and IPSec SA. In main mode, this is done in steps 3 and 4.
DH public-key cryptography is based on DH key groups. Each key group is a fixed number of bits long. The longer the key, the more secure the encryption, but also the longer it takes to encrypt and decrypt information. For example, DH2 keys (1024 bits) are more secure than DH1 keys (768 bits), but DH2 keys take longer to encrypt and decrypt.
Authentication
Before the Zyxel Device and remote IPSec router establish an IKE SA, they have to verify each other’s identity. This process is based on pre-shared keys and router identities.
In main mode, the Zyxel Device and remote IPSec router authenticate each other in steps 5 and 6. The identities are also encrypted using the encryption algorithm and encryption key the Zyxel Device and remote IPSec router selected in previous steps.
You have to create (and distribute) a pre-shared key. The Zyxel Device and remote IPSec router use it in the authentication process, though it is not actually transmitted or exchanged.
Router identity consists of ID type. The ID type can be domain name, IP address, or email address. The content is only used for identification. Any domain name or email address that you enter does not have to actually exist. Similarly, any domain name or IP address that you enter does not have to correspond to the Zyxel Device’s or remote IPSec router’s properties.
The Zyxel Device and the remote IPSec router have their own identities, so both of them must store two sets of information, one for themselves and one for the other router. Local ID type refers to the content that applies to the router itself, and remote ID type refers to the content that applies to the other router.
For example, in the next table, the Zyxel Device and the remote IPSec router authenticate each other successfully. In contrast, in the following table, the Zyxel Device and the remote IPSec router cannot authenticate each other and, therefore, cannot establish an IKE SA.
Zyxel Device | Remote IPSec router |
|---|---|
Local ID type: tom@youroffice.com | Local ID type: 1.1.1.2 |
Peer ID type: 1.1.1.2 | Peer ID type: tom@youroffice.com |
Zyxel Device | Remote IPSec router |
|---|---|
Local ID type: tom@youroffice.com | Local ID type: 1.1.1.2 |
Peer ID type: 1.1.1.20 | Peer ID type: tom@youroffice.com |
It is also possible to configure the Zyxel Device to ignore the identity of the remote IPSec router. In this case, you usually leave the remote ID type field empty. This is less secure, so you should only use this if your Zyxel Device provides another way to check the identity of the remote IPSec router (for example, extended authentication) or if you are troubleshooting a VPN tunnel.
Additional Topics for IKE SA
This section provides more information about IKE SA.
Negotiation Mode
There are two negotiation modes for IKEv1--main mode and aggressive mode. Main mode provides better security, while aggressive mode is faster.
Main mode takes six steps to establish an IKE SA.
Steps 1 - 2: The Zyxel Device sends its proposals to the remote IPSec router. The remote IPSec router selects an acceptable proposal and sends it back to the Zyxel Device.
Steps 3 - 4: The Zyxel Device and the remote IPSec router exchange pre-shared keys for authentication and participate in a Diffie-Hellman key exchange, based on the accepted DH key group, to establish a shared secret.
Steps 5 - 6: Finally, the Zyxel Device and the remote IPSec router generate an encryption key (from the shared secret), encrypt their identities, and exchange their encrypted identity information for authentication.
In contrast, aggressive mode only takes three steps to establish an IKE SA. Aggressive mode does not provide as much security because the identity of the Zyxel Device and the identity of the remote IPSec router are not encrypted. It is usually used in remote-access situations, where the address of the initiator is not known by the responder and both parties want to use pre-shared keys for authentication. For example, the remote IPSec router may be a telecommuter who does not have a static IP address.
VPN, NAT, and NAT Traversal
You have to do the following things to set up NAT traversal.
• Enable NAT traversal on the Zyxel Device and remote IPSec router.
• Configure the NAT router to forward packets with the extra header unchanged. (See the field description for detailed information about the extra header.)
The extra header may be UDP port 500 or UDP port 4500, depending on the standard(s) the Zyxel Device and remote IPSec router support.
Certificates
It is possible for the Zyxel Device and remote IPSec router to authenticate each other with certificates. In this case, you do not have to set up the pre-shared key, local identity, or remote identity because the certificates provide this information instead.
• Instead of using the pre-shared key, the Zyxel Device and remote IPSec router check the signatures on each other’s certificates. Unlike pre-shared keys, the signatures do not have to match.
• The local and peer ID type and content come from the certificates.
IPSec SA Overview
Once the Zyxel Device and remote IPSec router have established the IKE SA, they can securely negotiate an IPSec SA through which to send data between computers on the networks.
This section introduces the key components of an IPSec SA.
Local Network and Remote Network
In an IPSec SA, the local network, the one(s) connected to the Zyxel Device, may be called the local policy. Similarly, the remote network, the one(s) connected to the remote IPSec router, may be called the remote policy.
Active Protocol
The active protocol controls the format of each packet. It also specifies how much of each packet is protected by the encryption and authentication algorithms. IPSec VPN includes two active protocols, AH (Authentication Header, RFC 2402) and ESP (Encapsulating Security Payload, RFC 2406).
Usually, you should select ESP. AH does not support encryption, and ESP is more suitable with NAT.
Encapsulation
There are two ways to encapsulate packets. Usually, you should use tunnel mode because it is more secure. Transport mode is only used when the IPSec SA is used for communication between the Zyxel Device and remote IPSec router (for example, for remote management), not between computers on the local and remote networks.
In tunnel mode, the Zyxel Device uses the active protocol to encapsulate the entire IP packet. As a result, there are two IP headers:
• Outside header: The outside IP header contains the IP address of the Zyxel Device or remote IPSec router, whichever is the destination.
• Inside header: The inside IP header contains the IP address of the computer behind the Zyxel Device or remote IPSec router. The header for the active protocol (AH or ESP) appears between the IP headers.
In transport mode, the encapsulation depends on the active protocol. With AH, the Zyxel Device includes part of the original IP header when it encapsulates the packet. With ESP, however, the Zyxel Device does not include the IP header when it encapsulates the packet, so it is not possible to verify the integrity of the source IP address.
IPSec SA Proposal and Perfect Forward Secrecy
An IPSec SA proposal is similar to an IKE SA proposal (see IKE SA Proposal), except that you also have the choice whether or not the Zyxel Device and remote IPSec router perform a new DH key exchange every time an IPSec SA is established. This is called Perfect Forward Secrecy (PFS).
If you enable PFS, the Zyxel Device and remote IPSec router perform a DH key exchange every time an IPSec SA is established, changing the root key from which encryption keys are generated. As a result, if one encryption key is compromised, other encryption keys remain secure.
If you do not enable PFS, the Zyxel Device and remote IPSec router use the same root key that was generated when the IKE SA was established to generate encryption keys.
The DH key exchange is time-consuming and may be unnecessary for data that does not require such security.
PFS is ignored in initial IKEv2 authentication but is used when re-authenticating.
Additional Topics for IPSec SA
This section provides more information about IPSec SA in your Zyxel Device.
Authentication and the Security Parameter Index (SPI)
For authentication, the Zyxel Device and remote IPSec router use the SPI, instead of pre-shared keys, ID type and content. The SPI is an identification number.
• Use the Site to Site VPN screen (see The Site to Site VPN Screen) to view a summary of the VPN rules.
• Use the Site to Site VPN Add/Edit screens (see The Site to Site VPN Add/Edit Screen - Custom and The Site to Site VPN Add/Edit Screen - Custom) to create a VPN rule using the wizard or create a customized VPN rule with advanced settings.
• Use the Remote Access VPN screen (see The Remote Access VPN Screen) to create a remote access VPN rule.
What You Need to Know
An IPSec VPN tunnel is usually established in two phases. Each phase establishes a security association (SA), a contract indicating what security parameters the Zyxel Device and the remote IPSec router will use. The first phase establishes an Internet Key Exchange (IKE) SA between the Zyxel Device and remote IPSec router. The second phase uses the IKE SA to securely establish an IPSec SA through which the Zyxel Device and remote IPSec router can send data between computers on the local network and remote network.
Application Scenarios
The Zyxel Device’s application scenarios make it easier to configure your VPN connection settings.
Site-to-site | Site-to-site with dynamic peer |
|---|---|
Choose this if the remote IPSec router has a static IP address or a domain name. This Zyxel Device can initiate the VPN tunnel. The remote IPSec router can also initiate the VPN tunnel if this Zyxel Device has a static IP address or a domain name. | Choose this if the remote IPSec router has a dynamic IP address. You don’t specify the remote IPSec router’s address, but you specify the remote policy (the addresses of the devices behind the remote IPSec router). This Zyxel Device must have a static IP address or a domain name. Only the remote IPSec router can initiate the VPN tunnel. |
The Site to Site VPN Screen
The Site to Site VPN screen lists the VPN connection associated VPN gateway(s), and various settings. In addition, it also lets you activate or deactivate and connect or disconnect each VPN connection (each IPSec SA). Click a column’s heading cell to sort the table entries by that column’s criteria. Click the heading cell again to reverse the sort order.
Label | Description |
|---|---|
Monitor | The graph shows the number of connected and disconnected VPNs. |
Add | Click this to create a new entry. |
Edit | Double-click an entry or select it and click Edit to open a screen where you can modify the entry’s settings. |
Remove | To remove an entry, select it and click Remove. The Zyxel Device confirms you want to remove it before doing so. |
Active | To turn on an entry, select it and click Activate. |
Inactive | To turn off an entry, select it and click Inactivate. |
Connect | To connect an IPSec SA, select it and click Connect. |
Disconnect | To disconnect an IPSec SA, select it and click Disconnect. |
Status | The activate (light bulb) icon is lit when the entry is active and dimmed when the entry is inactive. The connect icon is lit when the interface is connected and dimmed when it is disconnected. |
Name | This field displays the name of the VPN rule. |
Outgoing Interface | This field displays the interface IP address or DNS name the VPN connection uses to transmit packets. |
Remote Gateway | This field displays the remote IPSec device IP address or DNS name in use for this VPN connection. |
Type | This field displays the type (route based or policy based) the VPN rule is using. |
Type | This field displays if the VPN rule is configured through wizard or a customized rule. |
Local | This field displays the IP address of the computer on your network. |
Remote | This field displays the IP address of the computer behind the remote IPSec device. |
The Site to Site VPN Add/Edit Screen- Wizard
The Site to Site VPN Add/Edit Gateway screen allows you to create a new VPN connection policy or edit an existing one. To access this screen, go to the VPN > Site to Site VPN screen, and click either the Add icon or an Edit icon. Select Site-to-Site in VPN > Site to Site VPN> Add/Edit > Scenario > Type to create a VPN rule using the wizard.
Scenario
Use this screen to configure the VPN connection name and select the scenario that best describes your intended VPN connection.
Each field is described in the following table.
Label | Description |
|---|---|
Name | Type the name used to identify this rule. You may use 1-31 single-byte characters, including 0-9a-zA-Z, underscores (_), or dashes (-), but the first character cannot be a number. This value is case-sensitive. |
IKE Version | Select IKEv1 or IKEv2. IKEv1 applies to IPv4 traffic only. IKEv2 applies to both IPv4 and IPv6 traffic. IKE (Internet Key Exchange) is a protocol used in setting up security associations that allows two parties to send data securely. See Virtual Private Networks (VPN) Overview for more information on IKEv1 and IKEv2. |
Type | Select Site-to-Site to configure the VPN rule using the wizard. Select Custom to configure the VPN rule with customized settings. |
Behind NAT | None/ Local Site: The remote IPSec device has a static IP address or a domain name. This Zyxel Device can initiate the VPN tunnel. Remote Site: The remote IPSec device has a dynamic IP address. Only the remote IPSec device can initiate the VPN tunnel. |
Network
Use this screen to configure the Zyxel Device interface and remote IPSec device settings.
Each field is described in the following table.
Label | Description |
|---|---|
My Address | Select an interface or enter the IPv4 address or domain name of the interface the VPN connection uses to transmit packets out of the Zyxel Device. |
Peer Gateway Address | Enter the WAN IPv4 address or domain name of the remote IPSec device to identify the remote IPSec router by its IP address or domain name. |
Zone | Select a zone for the IPSec policy. Go to Security Policy > Policy Control to make sure that a security policy will not block traffic going to the zone you select. |
Authentication
Use this screen to configure the authentication type and settings.
Each field is described in the following table.
Label | Description |
|---|---|
Pre-Shared Key | Select this to have the Zyxel Device and remote IPSec router use a pre-shared key (password) of up to 128 characters to identify each other when they negotiate the IKE SA. Type the pre-shared key in the field to the right. The pre-shared key can be: • 8 to 128 single-byte characters, including [0-9][a-z][A-Z]['(){}<>^`+/:!*_#@&=$\.~%,|;-"] The Zyxel Device and remote IPSec router must use the same pre-shared key. Click the eye icon to see the pre-shared key in readable plain text. |
Certificate | Alternatively, select Certificate to use one of the Zyxel Device certificates for authentication. |
Policy & Routing
Use this screen to configure the IP addresses of the computer on your network and the computer behind the remote IPSec device.
Each field is described in the following table.
Label | Description |
|---|---|
Type | Select Route-Based to create a VPN rule that encrypts traffic based on the static route settings. Select Policy-Based to create a VPN rule that encrypts traffic based on the IPv4 addresses you set in Local Subnet and Remote Subnet. |
Local Subnet | Type the IP address of a computer on your network that can use the tunnel. You can also specify a subnet. This must match the remote IP address configured on the remote IPSec device. |
Remote Subnet | Type the IP address of a computer behind the remote IPSec device. You can also specify a subnet. This must match the local IP address configured on the remote IPSec device. |
Summary
Use this screen to view a summary of the VPN tunnel configurations. You can click Edit to change the VPN tunnel configuration settings.
The Site to Site VPN Add/Edit Screen - Custom
The Site to Site VPN Add/Edit Gateway screen allows you to create a new VPN connection policy or edit an existing one. To access this screen, go to the VPN > Site to Site VPN screen, and click either the Add icon or an Edit icon. Select Custom in VPN > Site to Site VPN> Add/Edit > Scenario > Type to create a customized VPN rule with advanced settings.
See Virtual Private Networks (VPN) Overview for more information on phase 1 and phase 2 settings; see IPSec VPN Background Information for more information on IKE SA proposals.
Each field is described in the following table.
Label | Description |
|---|---|
General Settings | |
Enable | Slide the switch to the right to activate this VPN connection |
Name | Type the name used to identify this rule. You may use 1-31 single-byte characters, including 0-9a-zA-Z, underscores (_), or dashes (-), but the first character cannot be a number. This value is case-sensitive. |
IKE Version | Select IKEv1 or IKEv2. IKEv1 applies to IPv4 traffic only. IKEv2 applies to both IPv4 and IPv6 traffic. IKE (Internet Key Exchange) is a protocol used in setting up security associations that allows two parties to send data securely. See Virtual Private Networks (VPN) Overview for more information on IKEv1 and IKEv2. |
Type | Select Route-Based to create a VPN rule that encrypts traffic based on the static route settings. Select Policy-Based to create a VPN rule that encrypts traffic based on the Local and Remote IPv4 addresses you set in Policy in Phase 2 Settings. |
Network | |
My Address | Select Interface to choose the interface on the Zyxel Device that will use the tunnel. Select Domain Name/IP to enter the IP address or FQDN of a computer on your network that will use the tunnel. This must match the remote IP address configured on the remote IPSec device. |
Peer Gateway Address | Select Domain Name/IP to enter the domain name or the IP address of the remote IPSec router. Select Dynamic Address if the remote IPSec router has a dynamic IP address (and does not use DDNS). |
Zone | Select a zone for the IPSec policy. 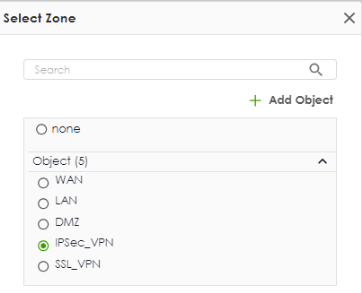 Go to Security Policy > Policy Control to make sure that a security policy will not block traffic going to the zone you select. |
Authentication | |
Pre-Shared Key | Select this to have the Zyxel Device and remote IPSec router use a pre-shared key (password) of up to 128 characters to identify each other when they negotiate the IKE SA. Type the pre-shared key in the field to the right. The pre-shared key can be: • 8 to 128 single-byte characters, including [0-9][a-z][A-Z]['(){}<>^`+/:!*_#@&=$\.~%,|;-"] The Zyxel Device and remote IPSec router must use the same pre-shared key. Click the eye to see the pre-shared key in readable plain text. |
Certificate | Alternatively, select Certificate to use one of the Zyxel Device certificates for authentication. |
Advanced Settings | |
Local ID | Enter one of the followings to identify the Zyxel Device during authentication. IPv4 - the Zyxel Device is identified by an IP address DNS - the Zyxel Device is identified by a domain name E-mail - the Zyxel Device is identified by the string specified in this field |
Remote ID | Enter one of the followings to identify the remote IPSec router during authentication. IPv4 - the remote IPSec router is identified by an IP address DNS - the remote IPSec router is identified by a domain name E-mail - the remote IPSec router is identified by the string specified in this field If the Zyxel Device and remote IPSec router use certificates, there is one more choice. Subject Name - the remote IPSec router is identified by the subject name in the certificate |
Phase 1 Settings | This establishes a secure tunnel between the Zyxel Device and the peer site. |
SA Life Time | Set how often the Zyxel Device renegotiates the IKE SA. A short SA life time increases security, but renegotiation temporarily disconnects the VPN tunnel. The value you set for the SA life time in Phase 1 Settings should be greater than or equal to the value you set for the SA life time in Phase 2 Settings. |
Add | Click this to add an entry. |
Edit | Select an entry and click this to edit the entry. |
Remove | Select an entry and click this to remove the entry. |
Proposal | |
Encryption | Select which key size and encryption algorithm to use in the IPSec SA. Choices are: des-cbc - a 56-bit key with the DES encryption algorithm 3des-cbc - a 168-bit key with the DES encryption algorithm aes128-cbc - a 128-bit key with the AES encryption algorithm aes192-cbc - a 192-bit key with the AES encryption algorithm aes256-cbc - a 256-bit key with the AES encryption algorithm The Zyxel Device and the remote IPSec router must both have at least one proposal that uses the same encryption and the same key. Longer keys are more secure, but require more processing power, resulting in increased latency and decreased throughput. |
Authentication | Select which hash algorithm to use to authenticate packet data in the IPSec SA. Choices are hmac-md5, hmac-sha1, hmac-sha256, hmac-sha384 and hmac-sha512. SHA is generally considered stronger than MD5, but it is also slower. The Zyxel Device and the remote IPSec router must both have a proposal that uses the same authentication algorithm. |
Diffie-Hellman Groups | Select which Diffie-Hellman key group (DHx) you want to use to create encryption keys. Choices are DH2, DH5, DH14, DH15, DH16, DH19, DH20, DH21, DH28, DH29, and DH30. The longer the key, the more secure the encryption, but also the longer it takes to encrypt and decrypt information. The Zyxel Device and the remote IPSec router must use the same DH key group. See IPSec VPN Background Information for more information on DH key group. Different operating systems may support different DH key groups. Check your operating system documentation. • For Windows VPN clients, Zyxel SecuExtender perpetual VPN clients versions 3.8.203.61.32 and earlier support DH1 to DH14. • For macOS VPN clients, Zyxel SecuExtender subscription VPN clients versions 1.2.0.7 and later support DH14 to DH21. For Windows VPN clients, Zyxel SecuExtender subscription VPN clients versions 5.6.80.007 and later support DH14 to DH21. • Windows versions 7, 10, 11 built-in IKEv2 VPN clients support DH2 by default. • macOS versions 14.2 and later built-in IKEv2 VPN clients support DH14 by default. • iOS versions 10.15 and later built-in IKEv2 VPN clients support DH14 by default. |
Advanced Settings | |
DPD Delay | Configure this field if you want the Zyxel Device to make sure the remote IPSec router is there before it transmits data through the IKE SA. The remote IPSec router must support Dead Peer Detection (DPD). Set how many seconds the Zyxel Device will wait before sending a message to the remote IPSec router it there has been no traffic. If the remote IPSec router responds, the Zyxel Device transmits the data. If the remote IPSec router does not respond, the Zyxel Device shuts down the IKE SA. This field applies for IKEv1 only. DPD is always performed when you use IKEv2. |
UDP Encapsulation | Enable to encrypt a UDP connection. |
Phase 2 Settings | This secures the actual data transmission between the Zyxel Device and the peer site, based on the secure key settings established in Phase 1. |
Initiation | Select how Phase 2 of the IPSec connection is established on the Zyxel Device. Auto: Select this to have the Zyxel Device listen for incoming traffic and automatically establish the Phase 2 of the IPSec connection when traffic is detected. Nailed-Up: Select this to have the Zyxel Device initiate Phase 2 of the IPSec connection. The Zyxel Device automatically renegotiates the IPSec SA when the SA lifetime expires, ensuring the continuity of the connection. Responder Only: Select this to have the Zyxel Device wait for the peer site to initiate the Phase 2 of the IPSec connection. |
Policy | |
Add | Click this to add an entry. |
Edit | Select an entry and click this to edit the entry. |
Remove | Select an entry and click this to remove the entry. |
Local | Enter the address corresponding to the local network. |
Remote | Enter the address corresponding to the remote network. |
Protocol | Select the protocol required to use this translation. Choices are: TCP, UDP, ICMP, GRE or Any. |
Active Protocol | Select which protocol you want to use in the IPSec SA. ESP (RFC 2406) - provides encryption and the same services offered by AH, but its authentication is weaker. The Zyxel Device and remote IPSec router must use the same active protocol. |
Encapsulation | Select which type of encapsulation the IPSec SA uses. Tunnel - this mode encrypts the IP header information and the data. The Zyxel Device and remote IPSec router must use the same encapsulation. |
SA Life Time | Set how often the Zyxel Device renegotiates the IKE SA. A short SA life time increases security, but renegotiation temporarily disconnects the VPN tunnel. The value you set for the SA life time in Phase 2 Settings should be lesser than or equal to the value you set for the SA life time in Phase 1 Settings. |
Add | Click this to add an entry. |
Edit | Select an entry and click this to edit the entry. |
Remove | Select an entry and click this to remove the entry. |
Encryption | Select which key size and encryption algorithm to use in the IPSec SA. Choices are: des-cbc - a 56-bit key with the DES encryption algorithm 3des-cbc - a 168-bit key with the DES encryption algorithm aes128-cbc - a 128-bit key with the AES encryption algorithm aes192-cbc - a 192-bit key with the AES encryption algorithm aes256-cbc - a 256-bit key with the AES encryption algorithm The Zyxel Device and the remote IPSec router must both have at least one proposal that uses use the same encryption and the same key. Longer keys are more secure, but require more processing power, resulting in increased latency and decreased throughput. |
Authentication | Select which hash algorithm to use to authenticate packet data in the IPSec SA. Choices are hmac-md5, hmac-sha1, hmac-sha256, hmac-sha384 and hmac-sha512. SHA is generally considered stronger than MD5, but it is also slower. The Zyxel Device and the remote IPSec router must both have a proposal that uses the same authentication algorithm. |
Perfect Forward Secrecy (PFS) | Select which Perfect Forward Secrecy (PFS) you want to use to create encryption keys. Choices are DH2, DH5, DH14, DH15, DH16, DH19, DH20, DH21, DH28, DH29, and DH30. The longer the key, the more secure the encryption, but also the longer it takes to encrypt and decrypt information. The Zyxel Device and the remote IPSec router must use the same DH key group. See IPSec VPN Background Information for more information on DH key group. |
Advanced Settings | |
NAT Rule | This is available if the VPN type is Policy-based. |
Add | Click this to add an entry. |
Edit | Select an entry and click this to edit the entry. |
Remove | Select an entry and click this to remove the entry. |
Pri. | Select the priority for the entry. The smaller the number, the higher the priority. |
Origin IP | Select the address object that represents the originating destination address. IP address of the sender in the remote network. |
Type | SNAT: Select this when there are no overlapping local and remote VPN IP addresses. 1:1 NAT: Select this to avoid overlapping local and remote VPN IP addresses. The peer IPSec router must create identical mirror configurations. |
Mapped IP | SNAT: Enter an IP address in the local IP address range to map the sender's source IP address for the VPN rule. 1:1 NAT: Enter an IP address or subnet in the Local IP address range to map the sender’s source IP address or subnet for the VPN rule (SNAT). The local IP address range must not conflict with the peer’s local IP address range. In the peer IPSec router, the destination IP from the sender is mapped to the local IP address of the receiver (DNAT). |
Apply | Click Apply to save your settings to the Zyxel Device. |
Cancel | Click Cancel to return to the profile summary page without saving any changes. |
Policy-Based VPN NAT Advanced Scenarios
The following are application scenarios for SNAT and 1-1 NAT.
SNAT VPN Scenario
Here is an example of SNAT VPN scenario. Use this when there are no overlapping local and remote VPN IP addresses. Map the source IP address of the sender to an IP address in the Local IP address range (in the Mapped IP field) for the VPN rule. The headquarters (HQ) and branch sites A and B need to access the remote datacenter (D). The source IP addresses of sites A and B are not in the range of the local policy's IP address (192.168.168.0/24) for Phase 2. NAT rules need to be configured to translate the source IP addresses of sites A and B to an IP address in the 192.168.168.0/24 range before entering the IPsec tunnel.
The administrator need to set up VPN policy on both sites.
local policy | remote policy |
|---|---|
192.168.168.0/24 | 192.168.100.0/24 |
site | TYPE | ORIGIN IP | MAPPED IP |
|---|---|---|---|
Site A | SNAT | 192.168.10.0/24 | 192.168.168.11/32 |
Site B | SNAT | 192.168.20.0/24 | 192.168.168.12/32 |
1-1 NAT VPN Scenario
Here is an example of a 1:1 NAT VPN scenario.Use this to avoid overlapping local and remote VPN IP addresses. IPSec router A and IPSec router B need to access each other, but they have overlapping subnets. To avoid conflicts, both IPSec routers need to create identical 1:1 NAT rules that map their local subnet to a non-overlapping subnet.
In the following example, IPSec router A is sending traffic to router B. Before data entering the VPN tunnel, the source IP address (set in Origin IP) from router A is translated to a mapped IP address (set in Mapped IP). After data exiting the VPN tunnel, router B translates the destination IP address (set in Mapped IP) back to the Origin IP.
The administrator need to set up VPN policy on both sites.
site | local policy | remote policy |
|---|---|---|
Site A | 192.168.20.0/24 | 192.168.30.0/24 |
Site B | 192.168.30.0/24 | 192.168.20.0/24 |
site | TYPE | ORIGIN IP | MAPPED IP |
|---|---|---|---|
Site A | 1:1 NAT | 192.168.169.0/24 | 192.168.20.0/24 |
Site B | 1:1 NAT | 192.168.169.0/24 | 192.168.30.0/24 |
The Remote Access VPN Screen
Configure the settings in this screen to create a new or edit an existing remote access VPN rule to securely access the Zyxel Device local networks from anywhere. See Virtual Private Networks (VPN) Overview for more information on phase 1 and phase 2 settings; see IPSec VPN Background Information for more information on IKE SA proposals.
SecuExtender is a Zyxel subscription-based VPN client. A remote access VPN client must have SecuExtender VPN client installed on his device and uses a supported computer operating system.
Make sure the settings configured on the IPSec VPN client matches the settings you configured on the Zyxel Device.
The following table describes the labels in this screen.
label | description |
|---|---|
Enable | Click the switch to enable the remote access VPN rule. |
Get SecuExtender VPN Client Software | Click to download SecuExtender to your computer. The supported operating systems for SecuExtender are: • Windows 10 (64-bit) and later versions. • macOS 10.15 and later versions. |
VPN configuration script download | Click to download a VPN configuration script to send to clients using IPSec VPN clients built into the operating systems. To use the download script, the built-in IPSec VPN clients need to use the following operating systems: • Clients using Windows 7 and later, iOS and macOS built-in IPSec VPN clients can import the VPN configuration script to configure a remote access VPN rule automatically. Click the link to download the script and send it to them. • Clients using Android should download the latest version strongSwan VPN client, then import the script to configure a remote access VPN rule automatically. Click the link to download the script and send it to them. • Clients using built-in IPSec VPN clients earlier than Windows 7 cannot use the script. They must configure a remote access VPN rule manually. Send the Pre-Shared Key and the Zyxel Device interface IP or domain name to them. |
Incoming Interface | |
Interface | Select an interface from the drop-down list box for incoming traffic to your Zyxel Device. |
Domain Name/IP | Enter the domain name if you are using DDNS to assign the interface a dynamic IP address (for example, vpn.zyxel.com). Enter the IPv4 address if you are using a static IP address. |
NAT Traversal | If the Zyxel Device is behind a NAT router, enter the public IP address or the domain name that is configured and mapped to the Zyxel Device on the NAT router. |
Zone | Select the security zone into which to add this VPN connection policy. Any security rules or settings configured for the selected zone apply to this VPN connection policy. |
Certificate for VPN Validation | |
Auto | Select Auto to have the Zyxel Device generate a certificate from the current remote access VPN settings. This is the certificate the Zyxel Device uses to identify itself when setting up the VPN tunnel. |
Manual | Select Manual to use an existing certificate from the drop-down list box. |
Local Network | |
Full Tunnel | Select Full Tunnel to encrypt all traffic through the VPN. Select Allow Client VPN Traffic Through WAN to allow only traffic encrypted by the Zyxel Device from the remote client to the Internet. |
Split Tunnel | Select Split Tunnel to only encrypt traffic going to networks behind the Zyxel Device. Enter an IPv4 address in CIDR notation, for example, type 192.168.1.1/24. Traffic going to the Internet from this IP address is encrypted. Traffic going to the Internet from the remote client does not go through the Zyxel Device is not encrypted. |
Client Network | |
IP Address Pool | Enter an IPv4 address in CIDR notation, for example, type 192.168.1.1/24. The IP address pool is used to assign IP addresses to the VPN clients. The SSL VPN IP pool should not overlap with IP addresses on the Zyxel Device's local networks and the SSL user's network. |
First DNS Server | Specify the IP address of the DNS server whose information the Zyxel Device sends to the remote users. This allows them to access devices on the local network using domain names instead of IP addresses. ZyWALL- the VPN clients use the IP address of the interface you specified in the SSL VPN rule and the Zyxel Device works as a DNS relay. Custom Defined- enter a static IPv4 address |
Second DNS Server | Enter a secondary DNS server IP address that is checked if the first one is unavailable. |
Authentication | You must first create a server in User & Authentication > AAA Server for it to display in the following fields. • If you have one authentication server, it can be on the Zyxel Device (local) or an external AAA server. • If you have two authentication servers, one of them must be on the Zyxel Device (local). You cannot use two external AAA servers. |
Primary/Secondary Server | Select local or a specified AAA server from the drop-down list box for the Zyxel Device to use for authentication. |
User | Select a user or user group to associate with this remote access IPSec VPN policy. |
Advanced Settings | |
SA Life Time | Set how often the Zyxel Device renegotiates the IKE SA. A short SA life time increases security, but renegotiation temporarily disconnects the VPN tunnel. The value you set for the SA life time in Phase 2 Settings should be lesser than or equal to the value you set for the SA life time in Phase 1 Settings. |
Add | Click this to add an entry. |
Edit | Select an entry and click this to edit the entry. |
Remove | Select an entry and click this to remove the entry. |
Encryption | Select which key size and encryption algorithm to use in the IPSec SA. Choices are: des-cbc - a 56-bit key with the DES encryption algorithm 3des-cbc - a 168-bit key with the DES encryption algorithm aes128-cbc - a 128-bit key with the AES encryption algorithm aes192-cbc - a 192-bit key with the AES encryption algorithm aes256-cbc - a 256-bit key with the AES encryption algorithm The Zyxel Device and the remote IPSec router must both have at least one proposal that uses use the same encryption and the same key. Longer keys are more secure, but require more processing power, resulting in increased latency and decreased throughput. |
Authentication | Select which hash algorithm to use to authenticate packet data in the IPSec SA. Choices are hmac-md5, hmac-sha1, hmac-sha256, hmac-sha384 and hmac-sha512. SHA is generally considered stronger than MD5, but it is also slower. The Zyxel Device and the remote IPSec router must both have a proposal that uses the same authentication algorithm. |
Diffie-Hellman Groups | Select which Diffie-Hellman key group (DHx) you want to use to create encryption keys. Choices are DH2, DH5, DH14, DH15, DH16, DH19, DH20, DH21, DH28, DH29, and DH30. The longer the key, the more secure the encryption, but also the longer it takes to encrypt and decrypt information. The Zyxel Device and the remote IPSec router must use the same DH key group. See IPSec VPN Background Information for more information on DH key group. Different operating systems may support different DH key groups. Check your operating system documentation. • For Windows VPN clients, Zyxel SecuExtender perpetual VPN clients versions 3.8.203.61.32 and earlier support DH1 to DH14. • For macOS VPN clients, Zyxel SecuExtender subscription VPN clients versions 1.2.0.7 and later support DH14 to DH21. For Windows VPN clients, Zyxel SecuExtender subscription VPN clients versions 5.6.80.007 and later support DH14 to DH21. • Windows versions 7, 10, 11 built-in IKEv2 VPN clients support DH2 by default. • macOS versions 14.2 and later built-in IKEv2 VPN clients support DH14 by default. • iOS versions 10.15 and later built-in IKEv2 VPN clients support DH14 by default. |
Apply | Click Apply to save your changes back to the Zyxel Device. |
Cancel | Click Cancel to return the screen to its last-saved settings. |
Remote Access VPN Setup Example
See the following table for VPN types and remote software options.
VPN Type | FEATURE | HOME USER software | Supported operating systems | Authentication Requirements |
|---|---|---|---|---|
Provides high security. May have lower connection speed and stability. | Windows, macOS, Linux, iOS, Android | • VPN account username and password • OVPN configuration file | ||
Windows, macOS | • VPN account username and password | |||
Provides high security, connection speed and stability. | Windows, macOS, iOS, and Android (strongSwan) | • VPN account username and password • Configuration file | ||
Windows, macOS | • VPN account username and password |
Zyxel Device Setup
Select SSL or IKEv2 to configure the Zyxel Device in the office. See SSL / IKEv2 VPN Comparison for the comparison between two VPN types.
SSL
1 Go to User & Authentication > User/Group > User, and click Add under User to create a VPN user account.
2 Set a VPN user name and password, then click Apply to save your changes. Note down the account name and password for the home user who will use this for future remote access authentication.
3 To configure SSL VPN on the Zyxel Device, go to VPN > SSL VPN.
Follow the table below to configure the VPN > SSL VPN screen.
Label | Description |
|---|---|
Enable | Click this to the right to enable SSL VPN. |
Interface | Select an interface for incoming traffic to your Zyxel Device. |
Clients will use VPN to access | Full Tunnel - Select this to encrypt all traffic through the VPN. Split Tunnel - Select this to only encrypt traffic going to networks behind the Zyxel Device. Enter an IPv4 address in CIDR notation, for example, type IP address 192.168.51.0/24. Traffic going to the Internet from this IP address is encrypted, and not encrypt traffic going to the Internet through the Zyxel Device. |
User | Select the user account you created in step 2 to allow SSL VPN access |
4 Click Apply to save the changes.
5 To allow the Zyxel Device to access VPN traffic from WAN, go to Object > Service > Service Group. Select Default_Allow_WAN_To_ZyWALL and click Edit.
6 Search for SSL VPN under Available and click > to add it to the allow list of traffic from the WAN to the Zyxel Device. Then, click Apply to save the changes.
IKEv2
1 Go to User & Authentication > User/Group > User, and click Add under User to create a VPN user account.
2 Set a VPN user name and password, then click Apply to save your changes. Note down the account name and password for future remote access authentication.
3 To configure IKEv2 VPN on the Zyxel Device, go to VPN > IPSec VPN > Remote Access VPN and enable IKEv2 VPN.
Follow the table below to configure the VPN > IPSec VPN > Remote Access VPN screen.
Label | Description |
|---|---|
Enable | Click this to the right to enable SSL VPN. |
Interface | Select an interface for incoming traffic to your Zyxel Device. |
Clients will use VPN to access | Internet and Local Networks (Full Tunnel) - Select this to encrypt all traffic through the VPN. Local Networks Only (Split Tunnel) - Select this to only encrypt traffic going to networks behind the Zyxel Device. Enter an IPv4 address in CIDR notation, for example, type IP address 192.168.51.0/24. Traffic going to the Internet from this IP address is encrypted, and not encrypt traffic going to the Internet through the Zyxel Device. |
User | Select the user account you created in step 2 to allow IKEv2 VPN access |
4 Click Apply to save your changes.
5 Send authentication details to the home user.
Home User Setup
The administrator has now finished setting up the VPN configuration on the Zyxel Device. Now, the home user needs to set up a VPN client software on their computer or mobile device to connect to the office network. See SSL / IKEv2 VPN Comparison for VPN software options for home user and more details.
SecuExtender
SecuExtender is a Zyxel subscription-based VPN client.
Home users using SecuExtender need the following:
• The SecuExtender VPN client software: They should get this from the Zyxel Device administrator, who downloads it from the VPN > IPSec VPN > Remote Access VPN > Get SecuExtender VPN Client Software screen. Alternatively, you can download it directly from the Zyxel website.
• VPN account username and password: They should get this from the Zyxel Device administrator, who sets it in the User & Authentication > User/Group > User screen.
Follow these steps to establish a VPN connection to the office’s network through SecuExtender:
1 Unzip, install, and open the SecuExtender VPN Client on your computer. Click Configuration > Get from Server, then enter the parameters as described below and click Next.
Label | Description |
|---|---|
Gateway Address | Enter the WAN IP address of the Zyxel Device. |
Authentication | Set as Login + Password. |
Login/Password | Enter the username and password the Zyxel Device administrator gave. |
2 The following screen appears, click OK.
3 Right click on the VPN policy you just created, then click Open tunnel to establish a remote VPN connection.
4 Re-enter the user name and password, then click OK. The icon next to the VPN policy turns green. You can now access the office network through the Zyxel Device.
OpenVPN Connect
Follow these steps to establish a VPN connection to the office’s network through OpenVPN Connect:
1 Home users using OpenVPN Connect need the following:
• The OpenVPN Connect client software.
• The VPN account username and password: They should get this from the Zyxel Device administrator, who sets it in the User & Authentication > User/Group > User screen.
• The OVPN configuration file: They should get this from the Zyxel Device administrator, who downloads it from the VPN > SSL VPN screen.
2 Go to the OpenVPN Connect website and download the OpenVPN Connect client for your computer’s operation system.
3 Run the OpenVPN Connect client on your computer. Click Browse and import the .OVPN file provided by Zyxel Device administrator.
4 In the Username field, enter the VPN user name the Zyxel Device administrator set. Click Connect to connect your computer to the office network.
5 Enter the VPN user password provided by the Zyxel Device administrator.
6 Your home computer can now access the office network through the Zyxel Device.
The IPSec VPN Client on Your Computer
Use the built-in VPN client in Windows, macOS, iOS, or Android (strongSwan).
Home users using the IPSec VPN client on their computers need the following:
• Configuration file: They should get this from the Zyxel Device administartor, who downloaded it from the VPN > IPSec VPN > Remote Access VPN screen.
Follow these steps to establish a VPN connection to the office’s network through the IPSec VPN client on a computer with a Windows operating system:
1 Obtain the configuration file, VPN account name and password from the Zyxel Device administrator.
2 Unzip and open the configuration file, then double-click on the .bat file to set up the certificate for the VPN connection.

3 A command-line interface will appear, showing the status of the VPN connection. To connect to the office network, click the Internet access icon, then click Connect next to the RemoteAccess network.
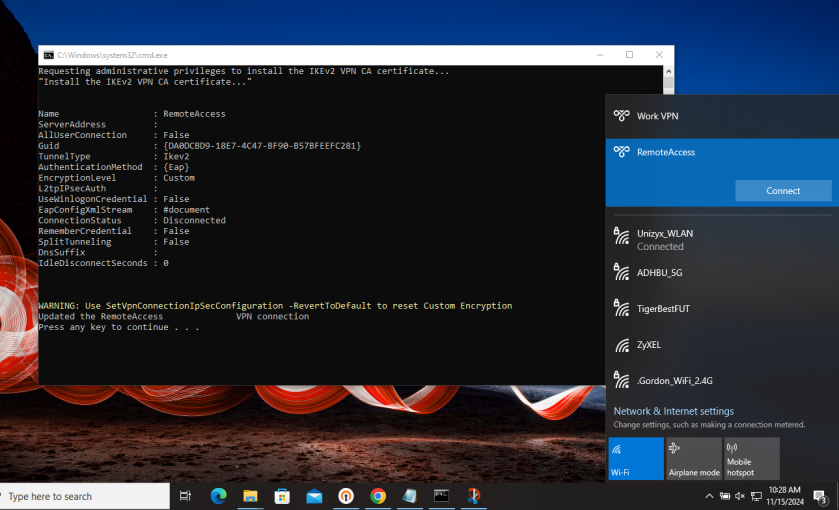
4 Enter the username and password provided by the administrator in the pop-up window, then click OK.

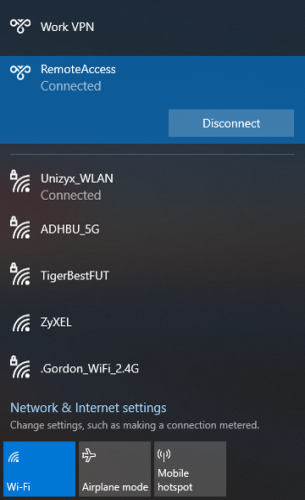
5 The following screen indicates you are now connected to the office network.
Test the VPN Connection
To test if the home user’s computer can successfully connect to the office’s network, they should open the Command Prompt and ping the IP address of a device in the LAN.